Lab 1: Introduction to Progressive Enhancement
This lesson will Introduce some basic concepts in XHTML, CSS and JavaScript with an emphasis on the concept of progressive enhancement.
Create the Directory Structure for Your Files
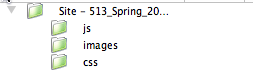
Create a 513 folder with 3 sub directories: js, images, and css.
Keep 'em Separated: Progressive Enhancement

When you write code to create a web page, you are doing three basic things:
1. Write XHTML that describes the content of the web page.
2. Write CSS that specifies the presentation of that content.
3. Write Javascript that controls the behavior of that content.
The way to accommodate the broadest possible range of visitors to your site is to think of the web in terms of these three layers:
1. Start by producing the content in HTML format. This is the base layer, which any visitor using any kind of browser should be able to view.
2. Next, focus on making the site look better, by adding a layer of presentation information using CSS. The site will look good to users who can display CSS styles.
3. Finally, use JavaScript to introduce an added layer of interactivity and dynamic behavior, which will make the site easier to use in browsers equipped with JavaScript.
Information referenced from pages 3-5 of Simply Javascript, by Kevin Yank and Cameron Adams.
XHTML Layer: Open a New XHTML file in Dreamweaver

Switch to code view and structure your content with XHTML.
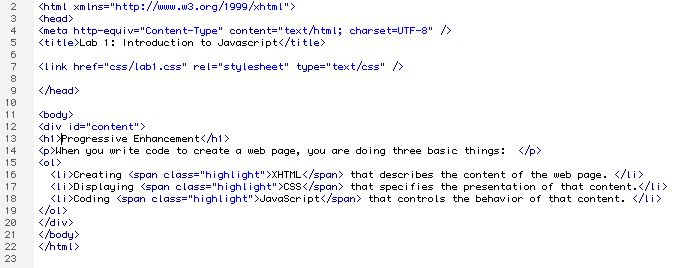
1. Give the page a title: "Lab 1: Introduction to Progressive Enhancement".
2. Give the page an H1 heading: Progressive Enhancement.
3. Create a paragraph and an unordered list.
4. Finally, wrap your content in a div with the id=content.
XHTML Rules:
1. Declare a DOCTYPE. The DOCTYPE goes before the opening HTML tag at the top of the page and tells the browser whether the page contains, HTML or XHTML. There are three main DOCTYPES: 1) Strict - All markup is XHTML 2) Transitional - markup is a mixture of HTML and XHTML (this is what we will be using) 3. Frameset - used for window frames (which I discourage).
2. Declare an XML namespace - this is added to your HTML tag. This gives a url which lists and defines all the valid XHTML tags.
3. Declare your content type which states your character coding used in the document. <meta http-equiv="Content-Type" content="text/html; charset=UTF-8" />
Dreamweaver will do these three steps for you when you create a new file.
4. Close every tag, even one sided tags by adding a /> at the end of the tag. For example: <img src="flower.jpg" alt="My Flower" />
5. All tags must be nested correctly. If a tag opens before a preceding one closes, it must be closed before that preceding one closes. For example,
<p> John is <strong>humble</strong> guy</p>.
6. Inline tags can't contain block level tags.
7. Write tags entirely in lowercase.
8. Attributes must have values and must be quoted.
9. Use the encoded equivalents for a left angle bracket and ampersand within content. When xhtml encounters, a left angle-bracket it assumes you are starting a tag. Instead use <
CSS Review (Read Only)
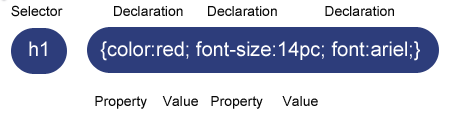
A style rule is made up of the selector and the declaration. The declarations are defined within curly brackets. The declaration is made up of a property value pair separated by a colon with multiple declarations separated by semi-colons.
There are three main types of style sheets:
1. Inline styles - Also known as local styles are added to the tag using XHTML style attributes. In most cases, these should be avoided. Example:
<p style="font-size: 25pts; font-weight:bold; color:red;">Red paragraph</p>
2. Embedded Styles - You can place a group of style rules within the head of your XHTML document between <style> tags.
3. External Style - Also known as linked styles, are the preferred method of adding CSS to your website and is consistent with progressive enhancement. The style rules are defined in an external text file that ends with .css and contains no html tags. The style sheet is linked to the XHTML file with a link tag. Example:
<link href="css/style.css" media="screen" rel="stylesheet" type="text/css">
There are three main types of selectors used to help define the styles within a web page.
1. A tag selector is used to define the styles for a certain html tag. In the style sheet, the tag selector is just the name of the tag without the < >. The H1 in the above example.
2. A class selector can be used multiple times within a web page. It is used to define a style for only certain tags. It is define with a period before it's name. Example:
.special text {color:red;}
3. An ID selector - Only a single instance of a particular ID can be in a page, but a class can appear many times. IDs are used to identify a unique piece of your XHTML code, like the header or footer. IDs are defined with a hash symbol. Example:
#footer {height:50px; color:blue;}
CSS: Add Some Style
We are going to create an external CSS file, to add some style to our simple page. Under the file menu in Dreamweaver, select New . . .click on CSS and then the Create button.
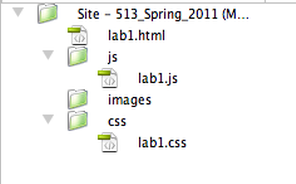
Save the file as lab1.css in your CSS folder. When we are done with this lab each file will be saved in it's own directory. The lab1.html file in the root 513 directory, the lab1.css in the CSS directory, and the lab1.js in the js directory (has not been created yet).
CSS Rules

The lab1.css file
Add the CSS rules above to your file.
Our style sheet has two tag selectors body and h1, a custom class selector .highlight and a unique ID selector #content.
Link your Style Sheet and Apply your Class Selectors
After you create your stylesheet you need to link it to your html file. <link href="css/lab1.css" rel="stylesheet" type="text/css" />
I also applied my .highlight class selector around the keywords XHTML, CSS, and JavaScript using the inline <span> tags.
Introduction to JavaScript
In this example, we are going to use JavaScript to print data to the page. This might seem kind of silly since we could just use HTML to accomplish the same task. However, as you create more complex scripts there will be times when you will need to output the data from your scripts onto your page. This is accomplished with a
window.document.write() script.
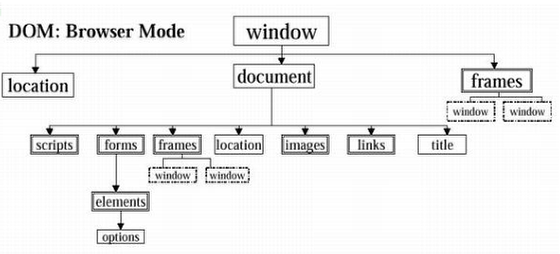
The root object in JavaScript is the browser window which is represented by the command window. Inside your browser window you have an HTML document. The word document is another JavaScript object. The correct syntax is to place a dot (period) between objects and methods in JavaScript. For practical purposes you can think of Objects as the nouns of JavaScript. When you want to write some to an html page, you use the write() method. You can think of methods as the verbs of Javascript. If you want to write a text string to the page, you would place it within quotes inside the parentheses of the write method. If you put it all together you can create a JavaScript statement. Think of statements as a single sentence in JavaScript. A Javascript statement ends with a semicolon. This is the statement terminator. You can think of this as the period at the end of the JavaScript sentence. Example:
window.document.write("Hello, my name is John.");
This would print the text, "Hello my name is John. to the web page.
Adding JavaScript to Our Page

Create a new JavaScript file in Dreamweaver. Save the file as lab1.js in the JS folder.
Comments can be added to an external JavaScript file by typing double slashes on a line. The comment below explains the purpose of this script.
// Print contact information to the footer of our website.
This file will contain two javascript statements that will print some data to the footer of our page.
The first line will write the text string "John C McGarvey Design copyright 2011 | " to the html document within the browser window. The second statement creates an email link. Notice the use of single quotes around the href attribute within the a tag. The use of double quotes here would have caused a syntax error.
window.document.write("<p>John C. McGarvey Design © 2011 | ");
window.document.write(" Contact: <a href='mailto:john@mcgarvey.com'>john@mcgarvey.com</a></p>");
Link the JavaScript Code to the XHTML file
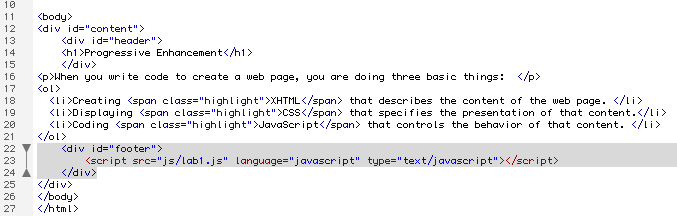
I decided to create a unique div with the id footer to contain the external JavaScript. While you are at it also add a div with the id header around the h1 tag.
Since we placed our script in an external file, we will need to create a link to the file within our web page.
To link to an external JavaScript file you need to use script tags.
<script src="js/lab1.js" language="javascript" type="text/javascript"></script>
Results of our Lab1 Web Page
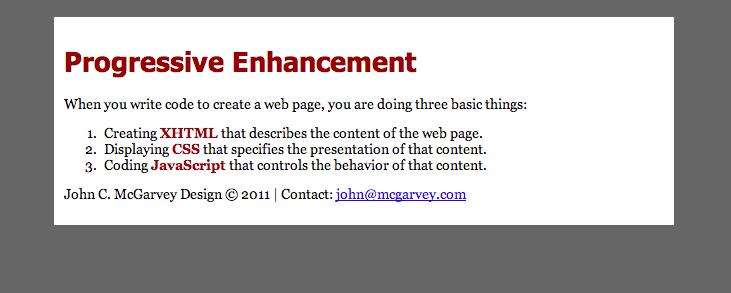
Notice how the information from the footer was printed dynamically from the external JavaScript file.
This is an example of a fixed width layout. The layout is fixed width because we defined the width of the content div at a set width of 600 pixels. Notice also that the website is centered in the middle of the browser window. The trick to accomplish this is to set the right and left margins of a containing div (#content in this example) to auto.
To review, in order to center a web page in the middle of your browser window, you need to give it a fixed width with left and right margins set to auto.
#content {
width: 600px;
margin-right: auto;
margin-left: auto;
}
Add a Full Page Background Image

Find a large Background image that is at least 960 pixels wide and save it into your Images folder, giving it the name bg.jpg.
Add the CSS rule for the HTML selector to add a large background image that fills the entire page without whitespace.
html {
background: url(images/bg.jpg) no-repeat center center fixed;
-webkit-background-size: cover;
-moz-background-size: cover;
-o-background-size: cover;
background-size: cover;
}
You will need to delete any background color from the body style in your external CSS file. New body CSS rule:
body {
font-family: Georgia, "Times New Roman", Times, serif;
font-size: 85%;
color: #000;
}
Tutorial: http://css-tricks.com/perfect-full-page-background-image/
Add Opacity to the Content Div

Open up your lab1.css file add the last four lines of code to your #content rule. This uses the filter declaration for Internet Explorer and the CSS3 standard opacity declaration.
#content {
background-color: #FFF;
padding: 10px;
width: 600px;
margin-top: 20px;
margin-right: auto;
margin-bottom: 20px;
margin-left: auto;
border:1px solid black;
/* for IE */
filter:alpha(opacity=60);
/* CSS3 standard */
opacity:0.6;
}
Transparency Tutorial: http://www.w3schools.com/Css/css_image_transparency.asp