Lab 2: JavaScript Variables
In this tutorial you will learn about two methods of the window object and how to define variables in JavaScript.
Open the lab1.js file from last week

In this tutorial, you are going to learn how to define variables in JavaScript.
Open the lab1.js file from last week and save it as lab2.js in the js sub folder.
In this file we are going to define two variables using the var command. A variable is used to hold values or expressions (just like Algebra). There are some rules for naming javascript variables. The variable names are case sensitive and variables must begin with a letter or underscore character.
In this example, I have declared two variable for your name and email. Each variable is storing a text string. A text string is represented by quotes (" ").
var name = "John C. McGarvey Design" ;
var email = "john@mcgarvey.com";
You can enter in your own name and email for your variables.
Reference: w3schools - Javascript Variables
Change the script to print your variables to the screen

Next, I am going to write two window.document.write statements to print the variables to the screen.
The most common error in your code will probably be the use of single and double quotes. Remember all your text strings need to be wrapped in double quotes, so I have used single quotes around the mailto: href attribute of my a link.
window.document.write("<p>" +name+ " © 2011 | ");
window.document.write(" Contact: <a href='mailto:" +email+ "'>" +email+ "</a></p>");
Save this file as lab2.js
Open your lab2_fixed.html file in Dreamweaver
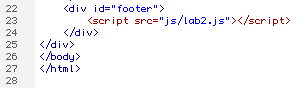
Open the lab2_fixed.html file that you created in the previous Lab2: CSS Layout 1 Column lesson. Go to the code view and between the footer, link to the new external JS file.
Preview the file in your browser and you should now have the dynamic text in your footer. This should look the same as it did last week.
Open a new HTML file in Dreamweaver
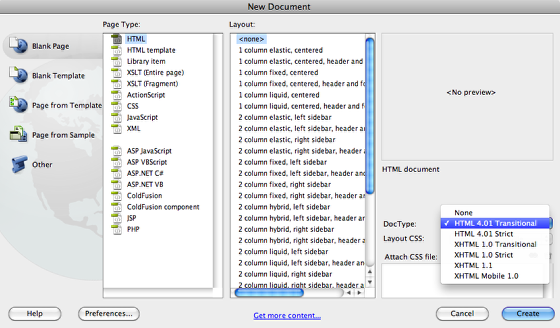
Open a new HTML file in Dreamweaver, since this page is going to have internal JavaScript it is best to set its DOC Type to HTML Transitional (reference the image above).
You are going to learn about two methods of the window object that display dialogues.
Save this file as lab2_window.html.
The root object in the JavaScript Document Object Model (DOM) is the window object. You can act upon the window object with these two different methods.
1. alert("Type Message Here"); The alert produces a dialogue box with text message and an OK button.
2. prompt("Ask question here","Place default answer here"); A prompt has two parameters. The first will produce the text in the dialogue box and the second will produce the default text in a textbox. It will also produce an OK and Cancel button.
Javascript Alert
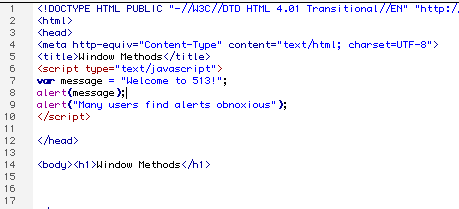
By calling a javascript alert, you can add a pop up dialogue box to your web page. All internal JavaScript must be placed within script tags.
Between the head section of this web page type the following in code view:
<script type="text/javascript">
alert("Many users find alerts obnoxious");
</script>
This alert will print the text string "Many users find alerts obnoxious" in a popup box.
You can also print the contents of a variable into your popup box.
Add the following code between the script tags above the previous alert script (reference the image above):
var message = "Welcome to 513!";
alert(message);
Adding an External Prompt Script
For our next script, we are going to add an external javascript file that will produce a prompt. The prompt will ask the user a question and provide a textbox for them to enter their response. Their response will be stored in a variable and printed to the page.
Create a new external JavaScript file. Save the file as lab2_greeting.js in the js sub folder.
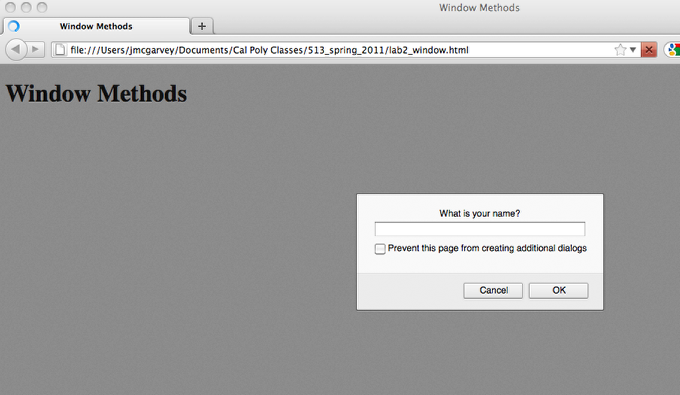
First you are going to declare a variable with the var command and store the users input from the prompt into the variable.
var greeting = prompt("What is your name?", " ");
Next, you will add a window.document.write statement that will print the variable to the page.
window.document.write("Hello " +greeting+ ", welcome to my web site. ");
Link the external script to your web page
The final step is to link your external script to the lab2_window.html page.
<script src="js/lab2_greeting.js" language="javascript" type="text/javascript"></script>
Preview the page in the browser and respond to your prompt. It should print your name to the page.
Save and upload your files to the server.