JS Lab 6: Text Properties and Javascript Forms
Create a new file in Dreamweaver named lab6_js_properties.html
1. Create a new file in Dreamweaver called lab6_js_properties.html
2. Add script tags between the body tags of the web page.
3. Declare a text string to the variable txt.
Use JavaScript Text Properties to Manipulate the Text
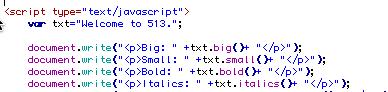
By using the .big() and .small() properties on the txt variable, you can change the size of the text string. This txt string is then printed to the screen using document.write statements.
Experiment with the following additional properties
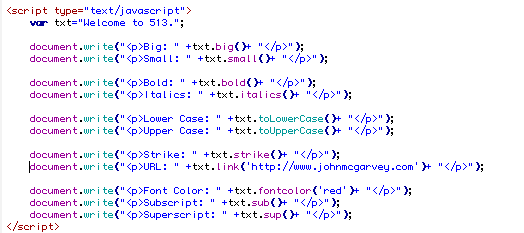
Review the image above and experiment with the different ways to manipulate the text string with JavaScript.
One of the common uses for this is take a user's input, and convert to lower case and then check it against a certain value.
Save the file and upload to your server.
Create a new file in Dreamweaver
1. Create a new file in Dreamweaver called lab6_js_menu.html.
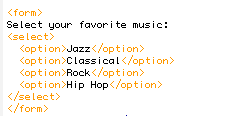
2. Type the following code between the body tags to create a html form and an empty results div:
<form>
Select your favorite music:
<select >
<option>Jazz</option>
<option>Classical</option>
<option>Rock</option>
<option>Hip Hop</option>
</select>
</form>
<div id="results"></div>
This creates an HTML form with a single form element, a select menu. In this tutorial, you are going to create an script that will print a text string within the results div based on the item selected in the menu.
Create a custom function

1. First step is to add script tags between your head tags so you can create a custom function. I called this function displayResult() and gave it the selTag parameter. The selTag parameter will contain the "this" keyword which will be used to select the current menu.
<script type="text/javascript">
function displayResult(selTag)
{
var x=selTag.options[selTag.selectedIndex].text;
}
</script>
2. Between the curly brackets, a variable x was declared. When the "this" keyword is passed through to the selTag parameter, the statement will be interpreted by the browser as follows:
this.options[this.seletedIndex].text;
This statement is saying in the current options form element return the text of the selected item.
Display the results of the variable within the results div

The next step is to take variable x and display it within a text string within the results div. To achieve this first you need to select the results div using document.getElementById method. Then use the innerHTML property to add the text string to the div.
Finally, add an event handler to call the function.
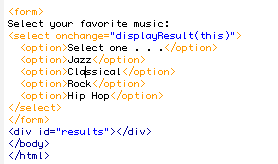
An onChange event handler is used to call the function and pass the this keyword.
<select onchange="displayResult(this)">
Save the file and upload to your server.
Open the guestbook template file in Dreamweaver

The template file contains an embedded stylesheet that defines the background color of the page and the width, border, and background color of the form with the id guestbook.
The template also contains an html form with text boxes, radio buttons, a text area box and two buttons. Review the html code within the template on how to create an html form.
Review XHTML code of a form
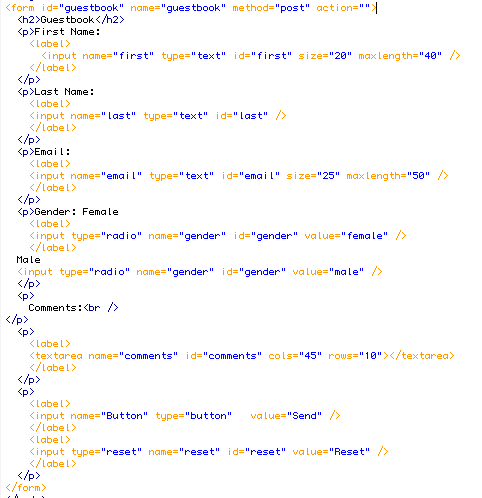
Look at the code view of the guestbook template file. Notice that the form has the unique Id, guestbook while each form element has it's own unique id. For example, id=name or id=comments.
Add a JavaScript function to thank your users for their comments
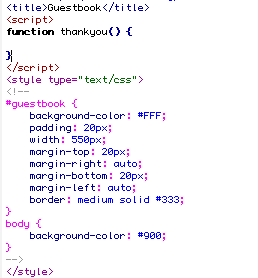
Add the thankyou() function and review the CSS code
<script>
function thankyou() {
}
</script>
Store the Users Input into variables

In the first part of the thankyou function, several variables are created that store the contents of the users input from the form. There are two common ways to achieve this in JavaScript. The most popular way is to use the getElementbyId
1) In the first example, the value of the text book names first, in the form named guestbook with the html document displayed in the browser window is stored in the variable fname.
2) In the second example, the form element with the Id of name is stored in the lname variable.
Create a new Popup Window in JavaScript
A new variable is created called OpenWindow. This variable contains the window.open() statement. The open() method contains three parameters separated by comas. First is the name of the file or URL of the new window.In this example, it is blank because the new window will display dynamic content not a static page. The second parameter is the name of the window, "newwin" and finally the third parameter applies the attributes of the window.
var OpenWindow = window.open("","newwin","height=400,width=600");
Use JavaScript to dynamically build the pop up window from the users input

Several document.write statements are used to build the html necessary to display the dynamic code into the OpenWindow browser window.
OpenWindow.document.write("<html><head>");
OpenWindow.document.write("<title>Thanks for Writing</title>");
OpenWindow.document.write("</head>");
OpenWindow.document.write("<body bgcolor='#900'>");
OpenWindow.document.write("<div id='guestbook''>");
OpenWindow.document.write("<p>Thank you <b>" +fname+ " " +lname+ "</b> from " +usermail+ " for filling out my guestbook.</p>");
OpenWindow.document.write("<p>Your message: <br>" +usercomments);
OpenWindow.document.write("</p><form><input type='button' value='Close Window' onClick='self.close()'></form>");
OpenWindow.document("</div></body></html>");
Call the function with an event handler
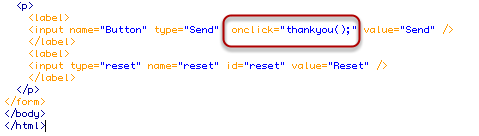
Add the onClick event handler to the send button to call the thankyou() function.
Save the file as lab6_guestbook.html